7. ELK引入Redis消息队列解耦
孙富阳, 江湖人称没人称。多年互联网运维工作经验,曾负责过孙布斯大规模集群架构自动化运维管理工作。擅长Web集群架构与自动化运维,曾负责国内某大型博客网站运维工作。
1.ELK引入Redis介绍
1.EFLK架构面临问题一:耦合度太高
举个例子:比如目前系统日志输出很频繁,十分钟大约5G,那么一个小时就是50G。而应用服务器的存储空间一般默认40Gb,所以通常会对应用服务器日志按小时轮转。如果我们的Logstash故障了1小时,那么Filebeat就无法向Logstash发送日志,但我们的应用服务器每小时会对日志进行切割,那么也就意味着我们会丢失1小时的日志数据。
解决办法:使用队列,只要你的filebeat能够收集日志,队列能够存储足够长时间的数据,那后面logstash或Elasticsearch故障了,也不用担心,修复后,日志依然能正常写入,也不会造成数据丢失,这样就完成了解耦。
2.此前架构面临问题二:性能瓶颈
举个例子:使用filebeat或logstash直接写入ES,那么日志频繁的被写入ES的情况下,可能会造成ES出现超时、丢失等情况。因为ES需要处理数据,性能会变缓。

解决办法:使用消息队列,filebeat或Logstash直接写入消息队列中就可以了,因为队列可以起到一个缓冲作用,最后我们的logstash根本自己的能力进行数据消费和处理,然后写入ES,这样能有效缓解ES写入性能的瓶颈。
3.redis队列的优势及致命缺点
优点
实现最简单
缺点
1.filebeat不支持写入redis集群。
2.redis是需要内存支持,大量的数据写入redis需要足够大的内存,成本较高。
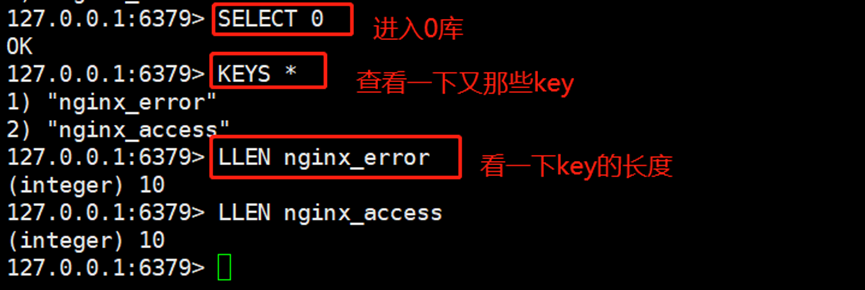
2.ELK对接Redis实操
1.安装并配置redis
[root@es-node2 ~]# yum -y install redis
[root@es-node2 ~]# grep "^[a-Z]" /etc/redis.conf
bind 10.0.0.151
requirepass 123456
....
[root@es-node2 ~]# systemctl restart redis
[root@es-node2 ~]# systemctl enable redis
2.修改filebeat输出数据至Redis
[root@es-node3 ~]# cat /etc/filebeat/filebeat.yml
filebeat.inputs:
- type: log
  enabled: true
  paths:
    - /var/log/access.log
  tags: ["access"]

- type: log
  enabled: true
  paths:
    - /var/log/error.log
  tags: ["error"]

output.redis:
  hosts: ["10.0.0.141:6379"]    #redis地址
  password: 123456              #redis密码
  timeout: 5                    #连接超时时间
  db: 0                         #写入db0库中
  keys:                         #存储的key名称
    - key: "nginx_access"
      when.contains:
        tags: "access"
    - key: "nginx_error"
      when.contains:
        tags: "error"
[root@es-node3 ~]# systemctl restart filebeat.service
[root@es-node3 ~]# head access.log > /var/log/nginx.log
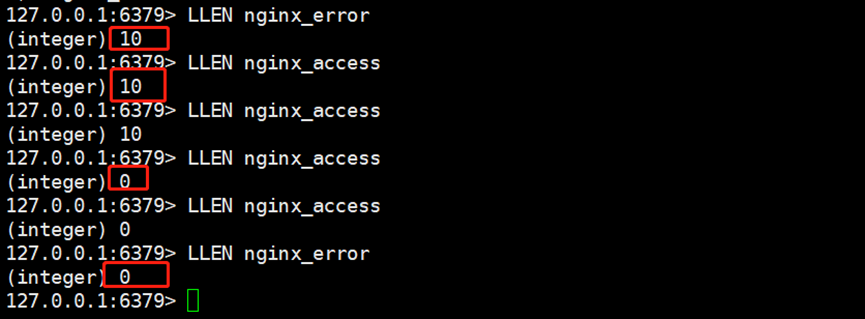
3.修改logstash从Redis中读取数据
[root@es-node3 ~]# cat /etc/logstash/conf.d/redis_nginx_es.conf
input {
    redis {
        host => ["10.0.0.151"]
        port => "6379"
        password => "123456"
        data_type => "list"
        key => "nginx_access"
        db => "0"
    }

    redis {
        host => ["10.0.0.151"]
        port => "6379"
        password => "123456"
        data_type => "list"
        key => "nginx_error"
        db => "0"
    }
}

filter {
	if "access" in [tags][0] {
		grok {
			patterns_dir => "/usr/local/logstash/patterns"
			match => {
				"message" => "%{NGINXACCESS}"
			}
		}
		useragent {
			source => "user_agent"
			target => "agent"
		}
		geoip {
			source => "http_x_forwarded_for"
			fields => ["country_name","country_code2","timezone","longitude","latitude","continent_code"]
		}
		date {
			# 09/Nov/2020:08:51:50 +0800
			match => ["log_timestamp", "dd/MMM/yyyy:HH:mm:ss Z" ]
			target => "@timestamp"
			timezone => "Asia/Shanghai"
		}
		mutate {
			convert => [ "body_bytes_sent", "integer" ]
			add_field => { "target_index" => "logstash-nginx-access-%{+YYYY.MM.dd}" }
		}
    } else if "error" in [tags][0] {

        date {
                match => ["timestamp","dd/MMM/yyyy:HH:mm:ss Z"]
                target => "@timestamp"
                timezone => "Asia/Shanghai"
        }


		mutate {
			add_field => { "target_index" => "logstash-nginx-error-%{+YYYY.MM.dd}" }
		}
	}

}

output {
    elasticsearch {
        hosts => ["10.0.0.151:9200","10.0.0.152:9200","10.0.0.150:9200"]
        index => "%{[target_index]}"
        template_overwrite => true
	user => "elastic"
	password => "iEj4tsQy7iFrdXdJjNY6"
    }

    stdout {
        codec => rubydebug
    }
}
Logstash启动后,发现消息已经消费完了
未经允许不得转载:孙某某的运维之路 » 7. ELK引入Redis消息队列解耦

评论已关闭